Documents
Documents are essential to Projects, containing the detailed plans and guidelines for how your project will be administered to successful outcomes.
Document Categories
Document categories are used to assign automatic prefixes and sequencing to documents. Categories also inform how your documents are organized inside a zip folder when you export a solicitation.
Categories are custom configured by your organization's Administrators. Common examples include Primary; Attachments; Exhibits.
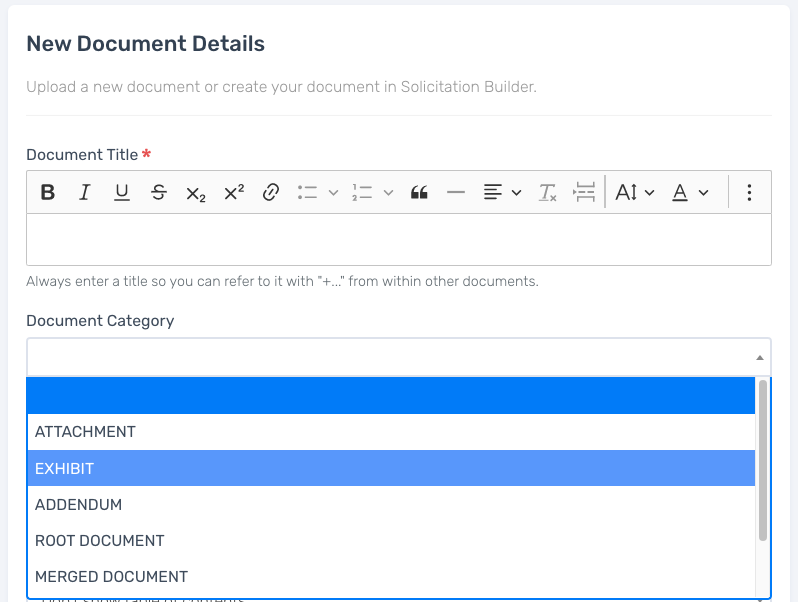
The most common Document Categories that are configured include:
Attachment
Exhibit
Root Document
When you choose Attachment or Exhibit:
Your document will have the category name prefixed to the title
Your document will automatically be numbered/lettered according to the organization’s settings.
This only impacts the organization of your files into folders/subfolder when you export
Your document will be exported in the main folder and not a subfolder.

Document Layout

Document Types
There are two types you can choose from: SB Template or Uploaded File. Document types help you create collaborative, cloud-based documents that you can work on with your team in Document Builder, and also give you the flexibility to upload and include specific file types that you might need for your project.
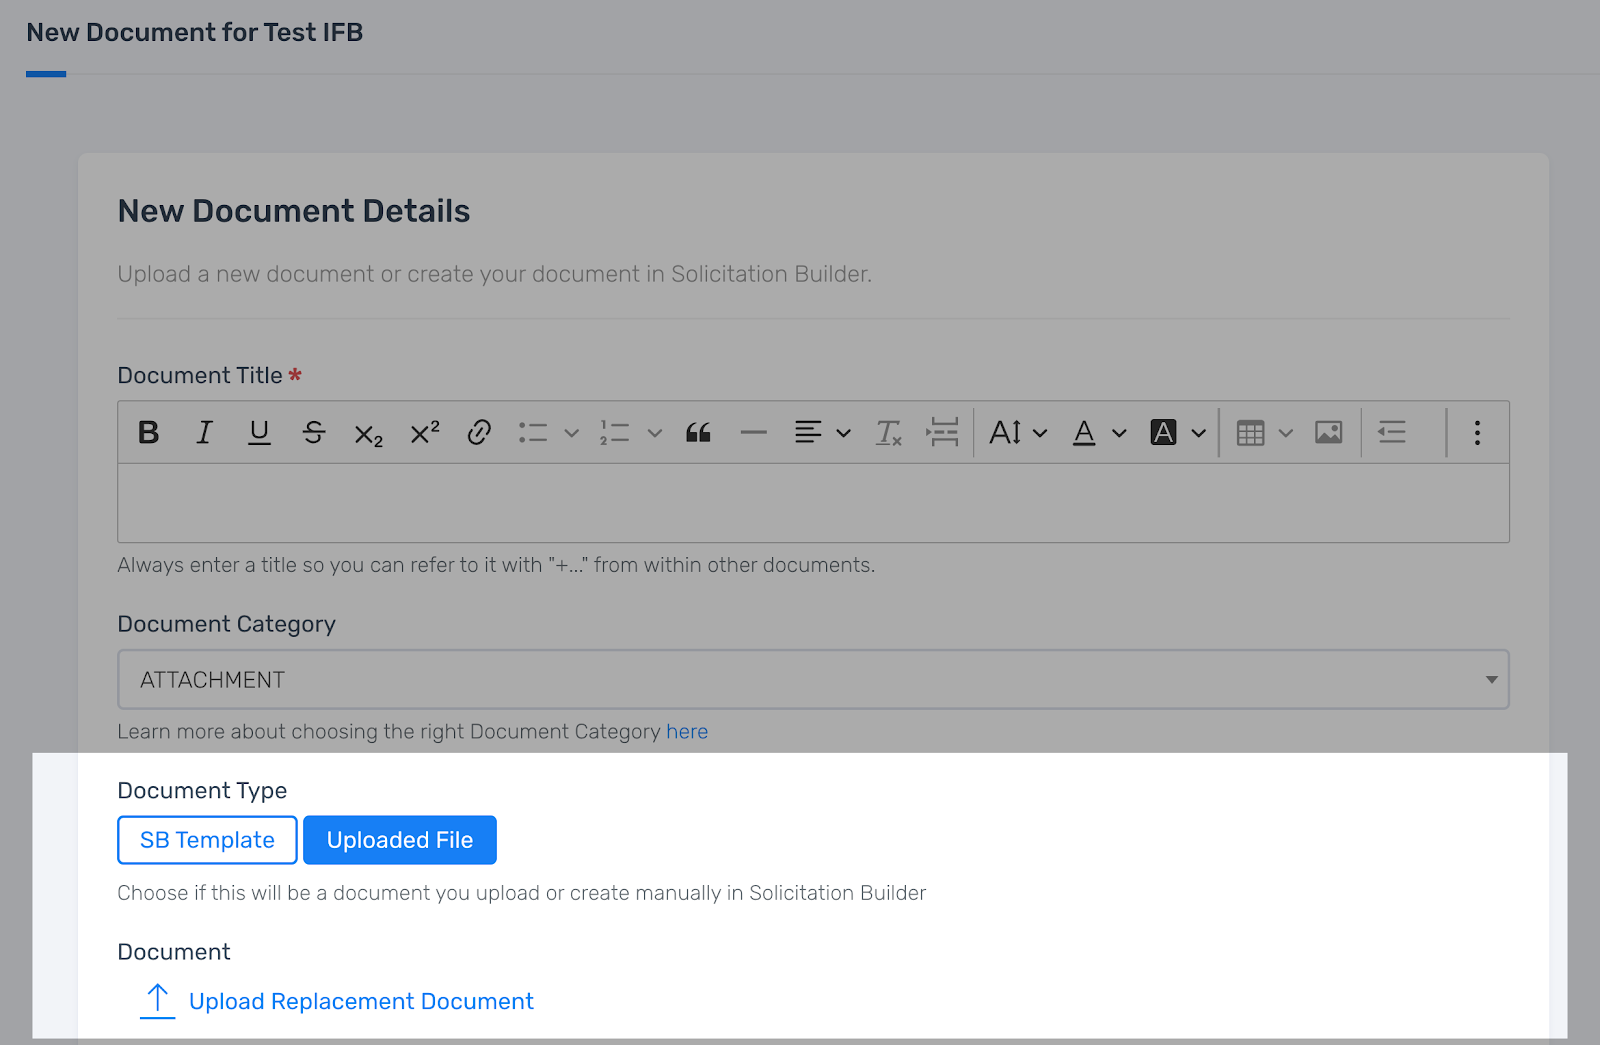
How Document Types are Exported
SB Templates: SB Templates mean that you and your team are inputting information into the platform directly. For example, when you export an attachment with this document type, edits/changes made with track changes on will show in the export.
Convert to PDF
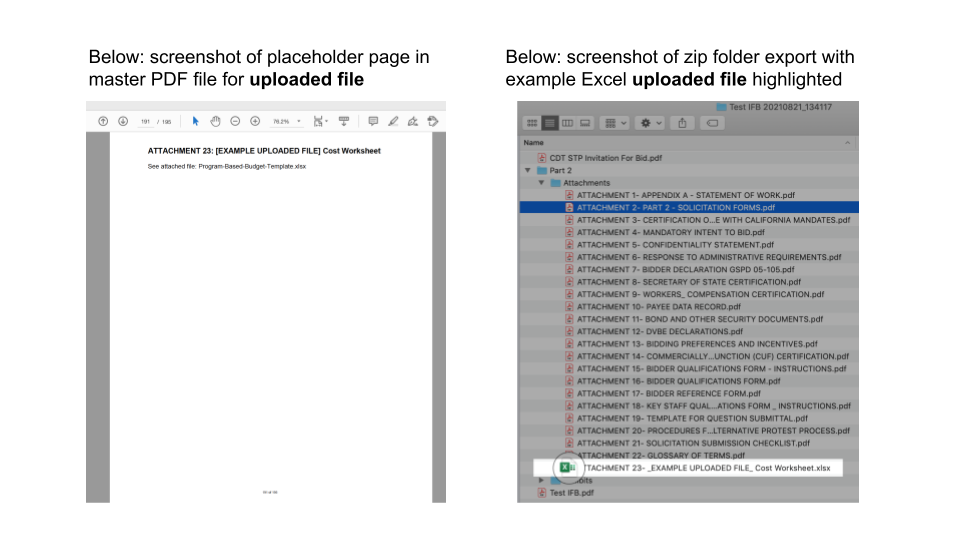
Every time you perform a full export, you will get a *bonus file* that merges all your PDF documents into 1 PDF master file. *Uploaded files will not be converted or merged into the PDF master file.
Uploaded files:
Retain their original file type when exported.
Not converted to PDF and not inserted in the master PDF; instead, a 1-page placeholder page with and instructions about where to find the uploaded file will be inserted in your master PDF
If you typically distribute the master, combined, PDF file and are now including an uploaded file in your solicitation - you will need to download the master file and the uploaded file from your Export page.
See screenshots below:
Administrator Guide to Creating Document Templates
Administrators: Creating New Document Templates
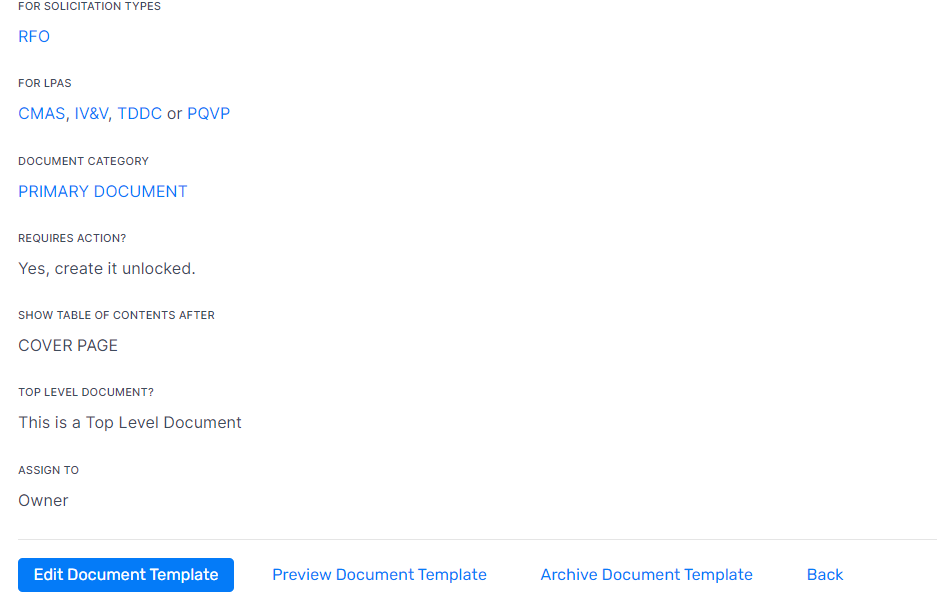
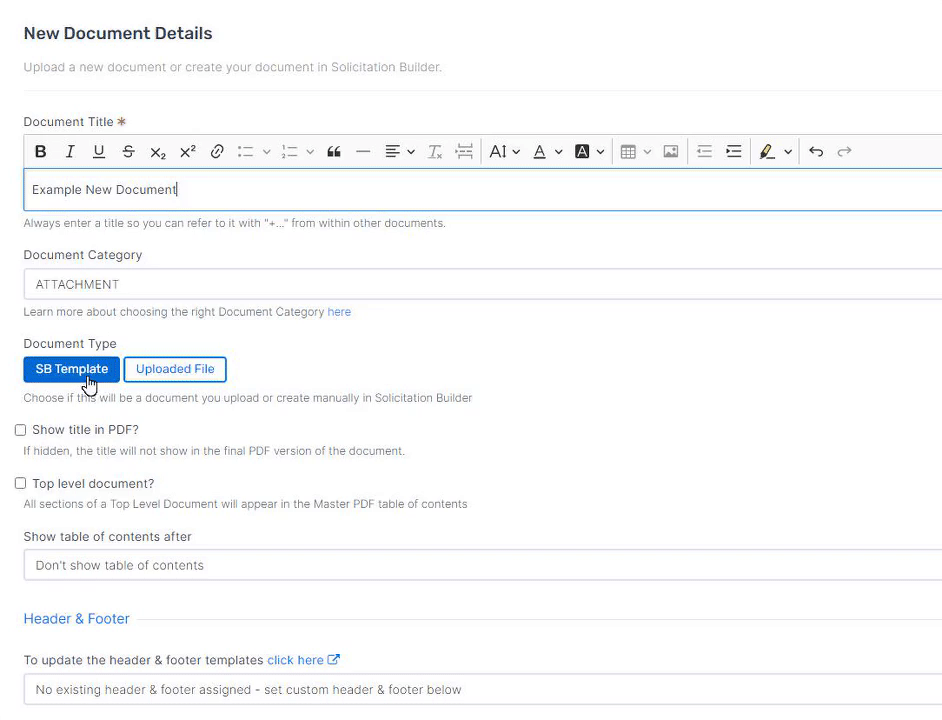
To create an SB document template:
- Select Configuration from the main menu.
- Navigate to the Document Templates pane and click Add New Document Template.
- Edit the name and choose the document category.
- For Document Type, Select SB Template.
- Indicate whether a copy should be generated for each Key Staff Role defined in the solicitation (click here for details.)
- Set inclusion criteria (For more on this, see Setting Inclusion Criteria for Templates and Sections.)
- Determine Project Settings, such as whether or not the document is complete or needs more additional work form an end user as well as assign responsibility as well as determine who is responsible for completing the document.
- Use the PDF settings to create a header and footer for the template.
- Click "Create Document Template".

Admins can reorder their document templates via the drag & drop method. While on the configuration page, simply left-click, hold, and drag the document title to the desired spot.
Administrators: Previewing Document Templates
Once you have created your Document Template, you will return to the Document Template Details screen. At the bottom of this screen, you have an options for Document Preview that allows you to review configured templates within the Configuration screen,; easily navigating through the template' sections for editing.
When you select "Preview Document Template", a preview of the Document Template displays (what it would look like if you created a Project).
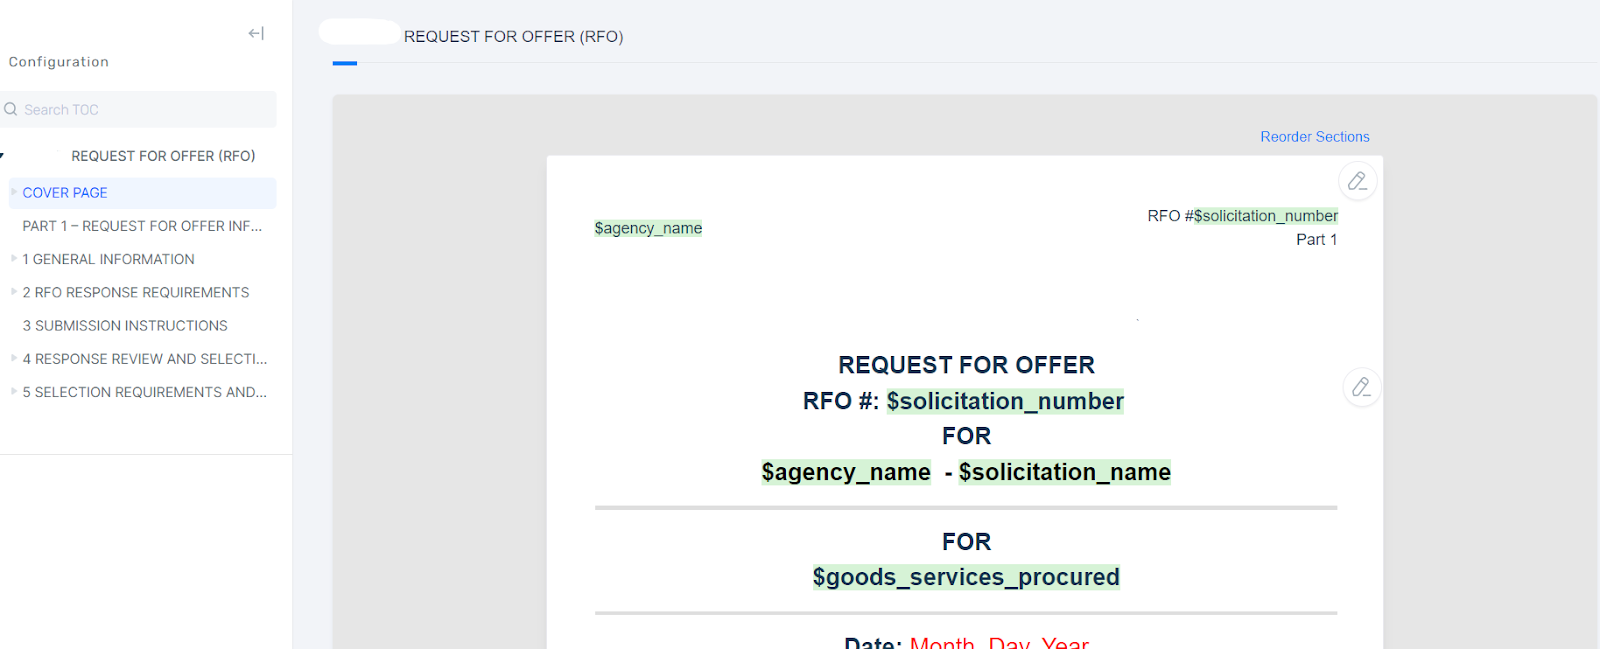
The Document Template Preview includes a left-side table of contents for easy navigation, as you would see in an actual Project. The table of contents will display the Document Template primary section and all nested sections, including the variations.
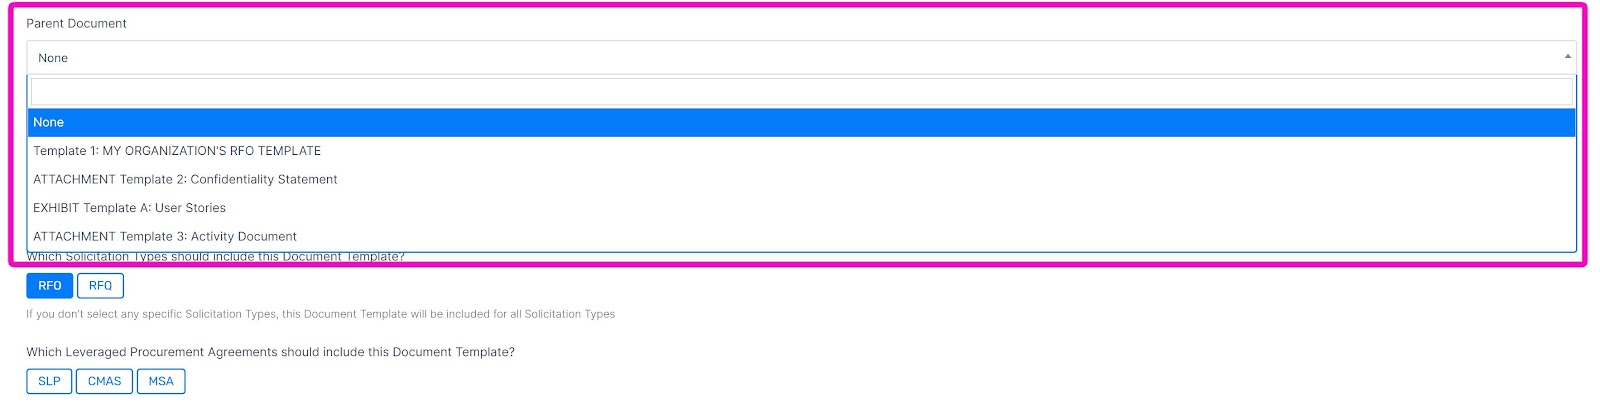
Administrators: Parent Documents
When creating document templates, the option of associating a particular document template with a Parent Document appears on the 'New Document Template Details' page.
Giving your document template a parent document template will ensure that both documents remain grouped together. Child document templates are numbered as sub-items to the parent document template. While each may be edited independently, the parent feature ensures they will always move together as a group within a solicitation.
One example use case for parent document templates would be if you had a set of documents that need to be filled out for each staff role but wanted to include a summary document describing those documents (in that case, the summary would be the parent, then the child documents would each be set to “generate a copy for each staff role,” resulting in a set of documents grouped as sub-items X.1, X.2, X.3 for the summary).
We also now have a feature that allows an Administrator to move a tree of section templates from one parent (section template) to another parent (section template) on the configuration side.Administrators: Parent Documents
In some cases, you might want certain documents to be grouped together within a solicitation, such as a document that contains instructions and the associated form.
Selecting a parent document template in a template's settings will ensure that the current template is only included with the parent. Any document created from a template like this will be numbered as a sub-item of the parent document in the solicitation’s outline.
Administrators: Headers & Footers
You can select a header and footer for your document template from a pre-existing header and footer template, or follow instructions to create your own.
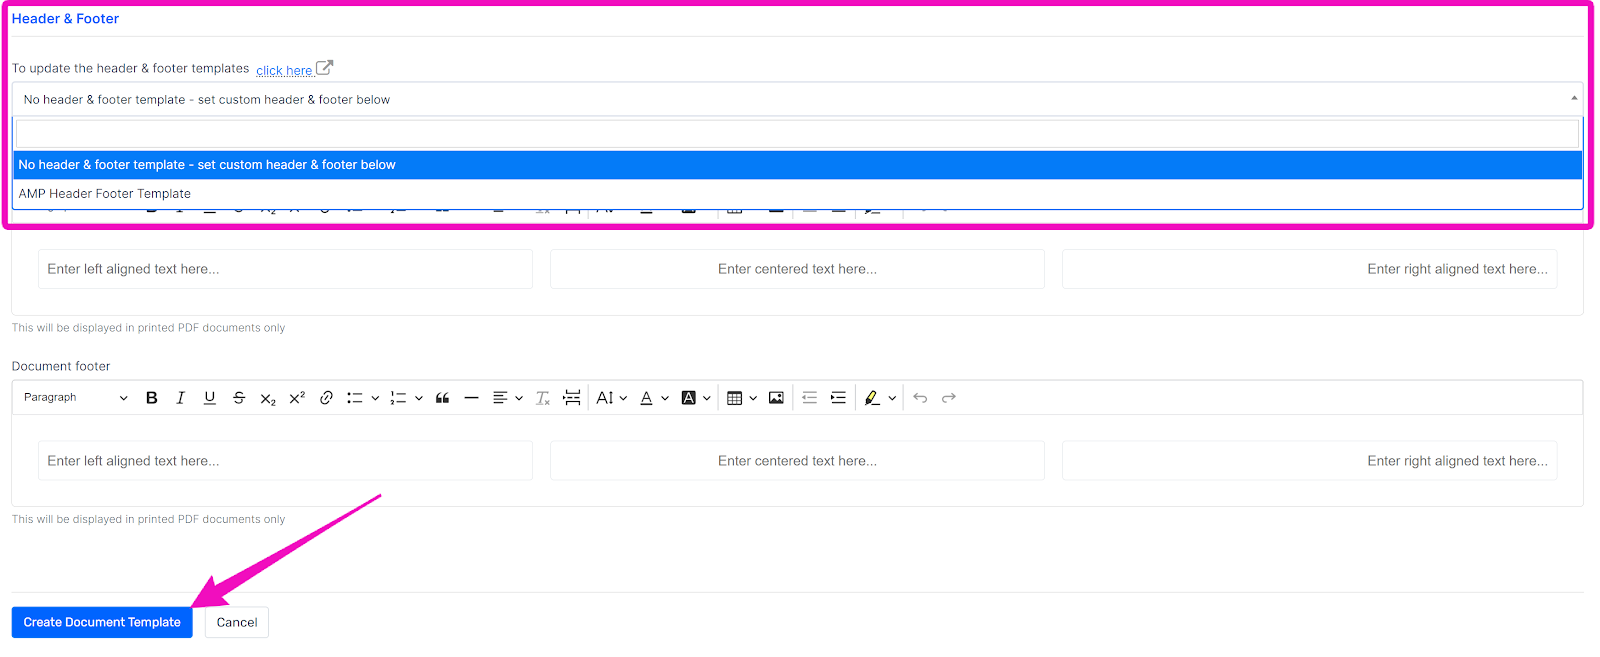
Once settings have been selected, click ‘Create Document Template’.
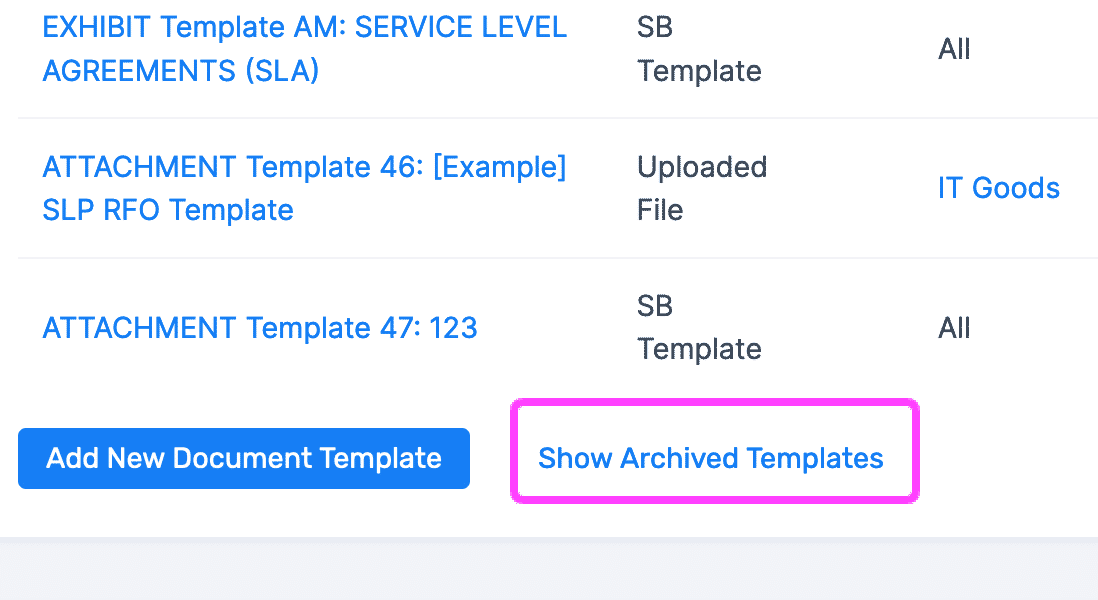
Administrators: How to Archive / Restore Document Templates
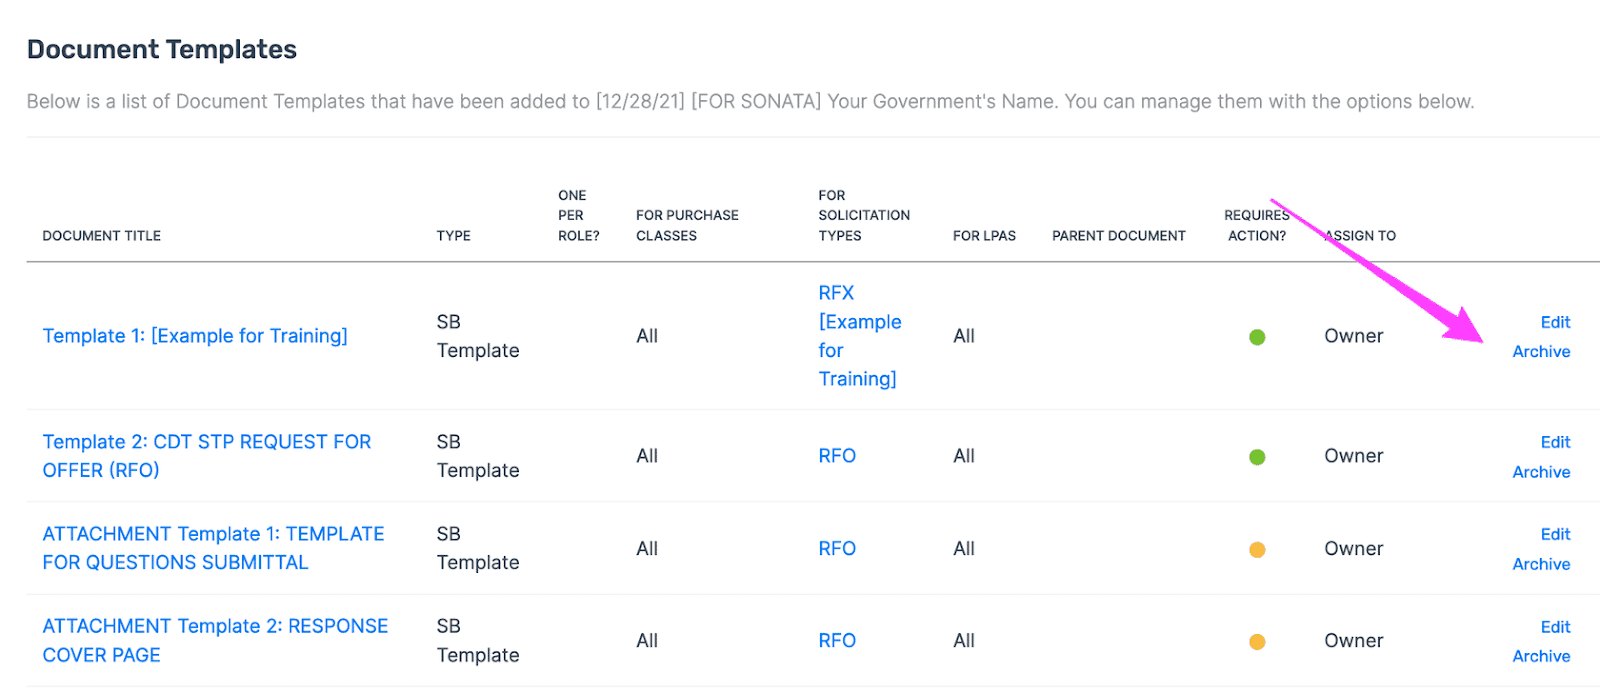
Restoring archived document templates is just as easy and doable by accessing the Archived Templates page and choosing to restore the archived template.
How to Add New Documents to Projects
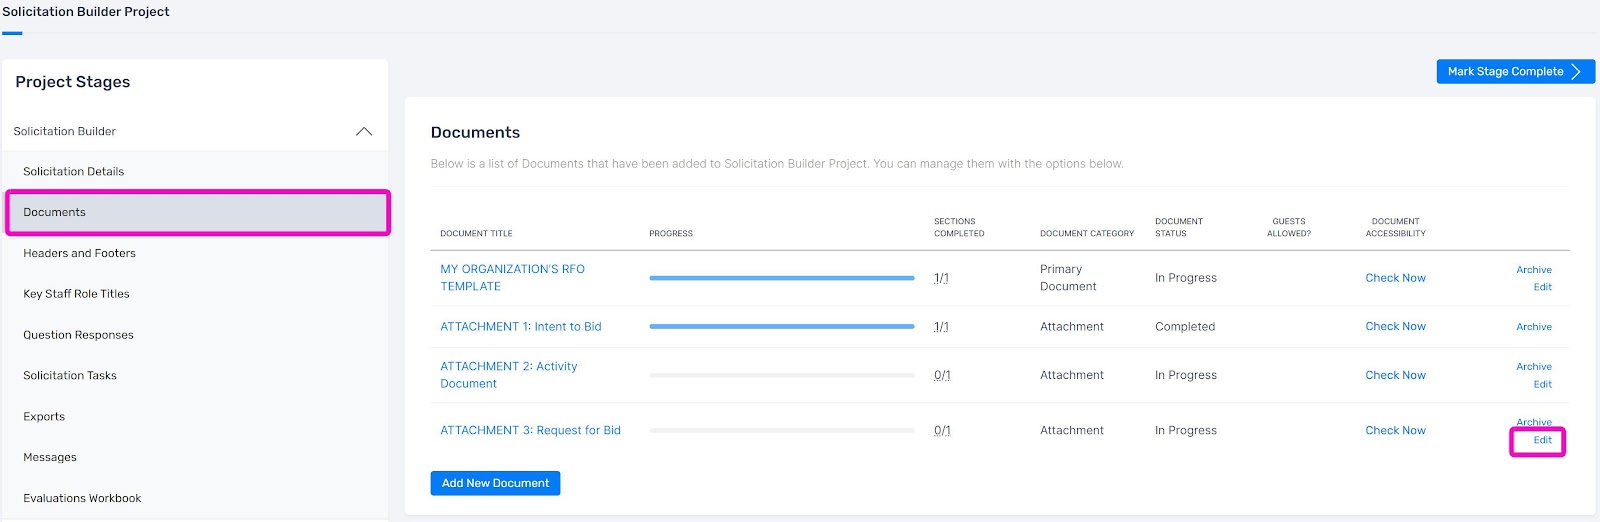
After opening a solicitation, navigate to the Document panel and select "Add New Document."
Then, enter the requested information, including document title and category.
- To add the prefix "Attachment" and a number to the title: choose category "Attachment"
- To add the prefix "Exhibit" and a letter to the title: choose category "Exhibit"
- To omit a prefix and number/letter from the title: choose category "Root Document"
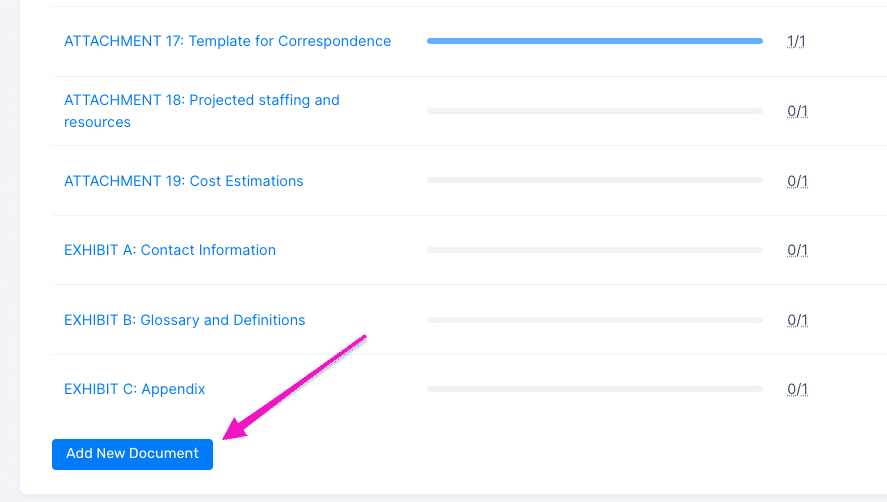
Once a document is added, you must add sections and subsections (if needed). All documents must contain at least one section.
You can add sections as soon as the document has been created.
Document Settings in Projects
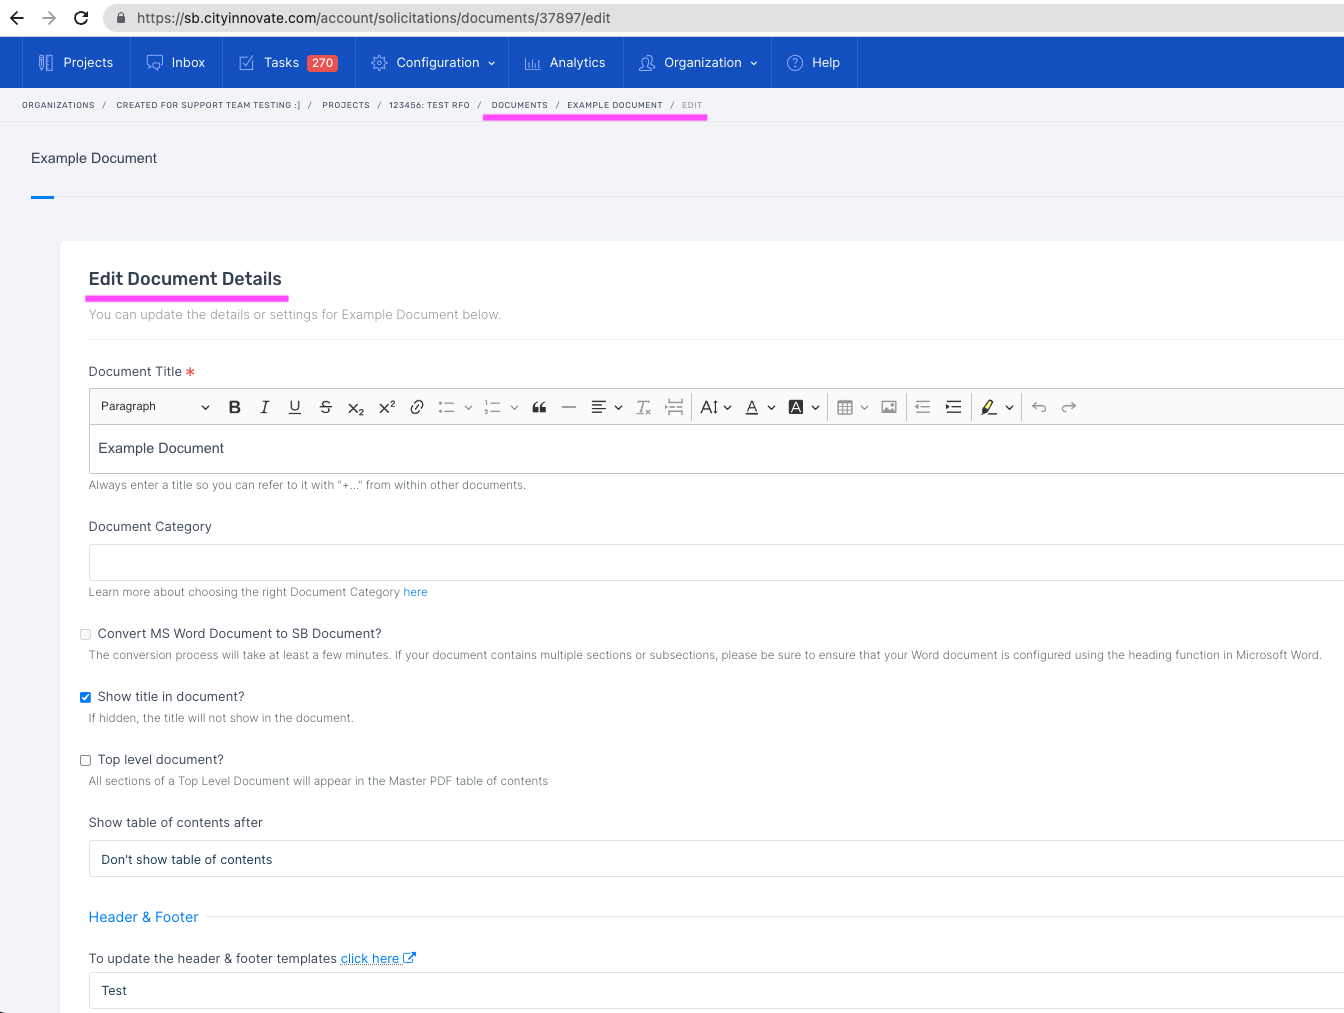
Owners/Editors can edit Document Settings to change the title, permissions, and other settings. Document Settings will allow you to adjust the following attributes of your Document:
- Document Title
- Document Title visibility (hide/unhide)
- Top Level Document designation (document title will appear in the table of contents if enabled)
- Table of Contents utilization (should this document populate the table of contents for your project/solicitation? If so, where?)
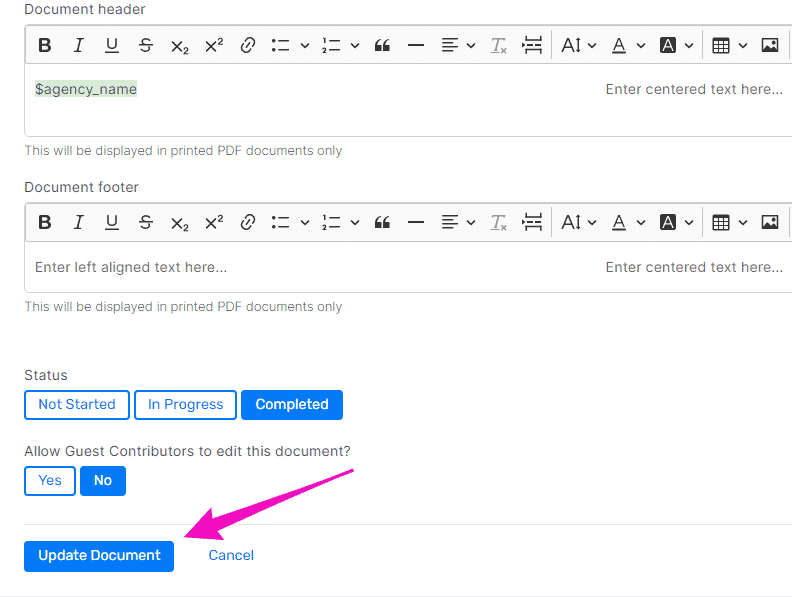
- Document Header & Footer
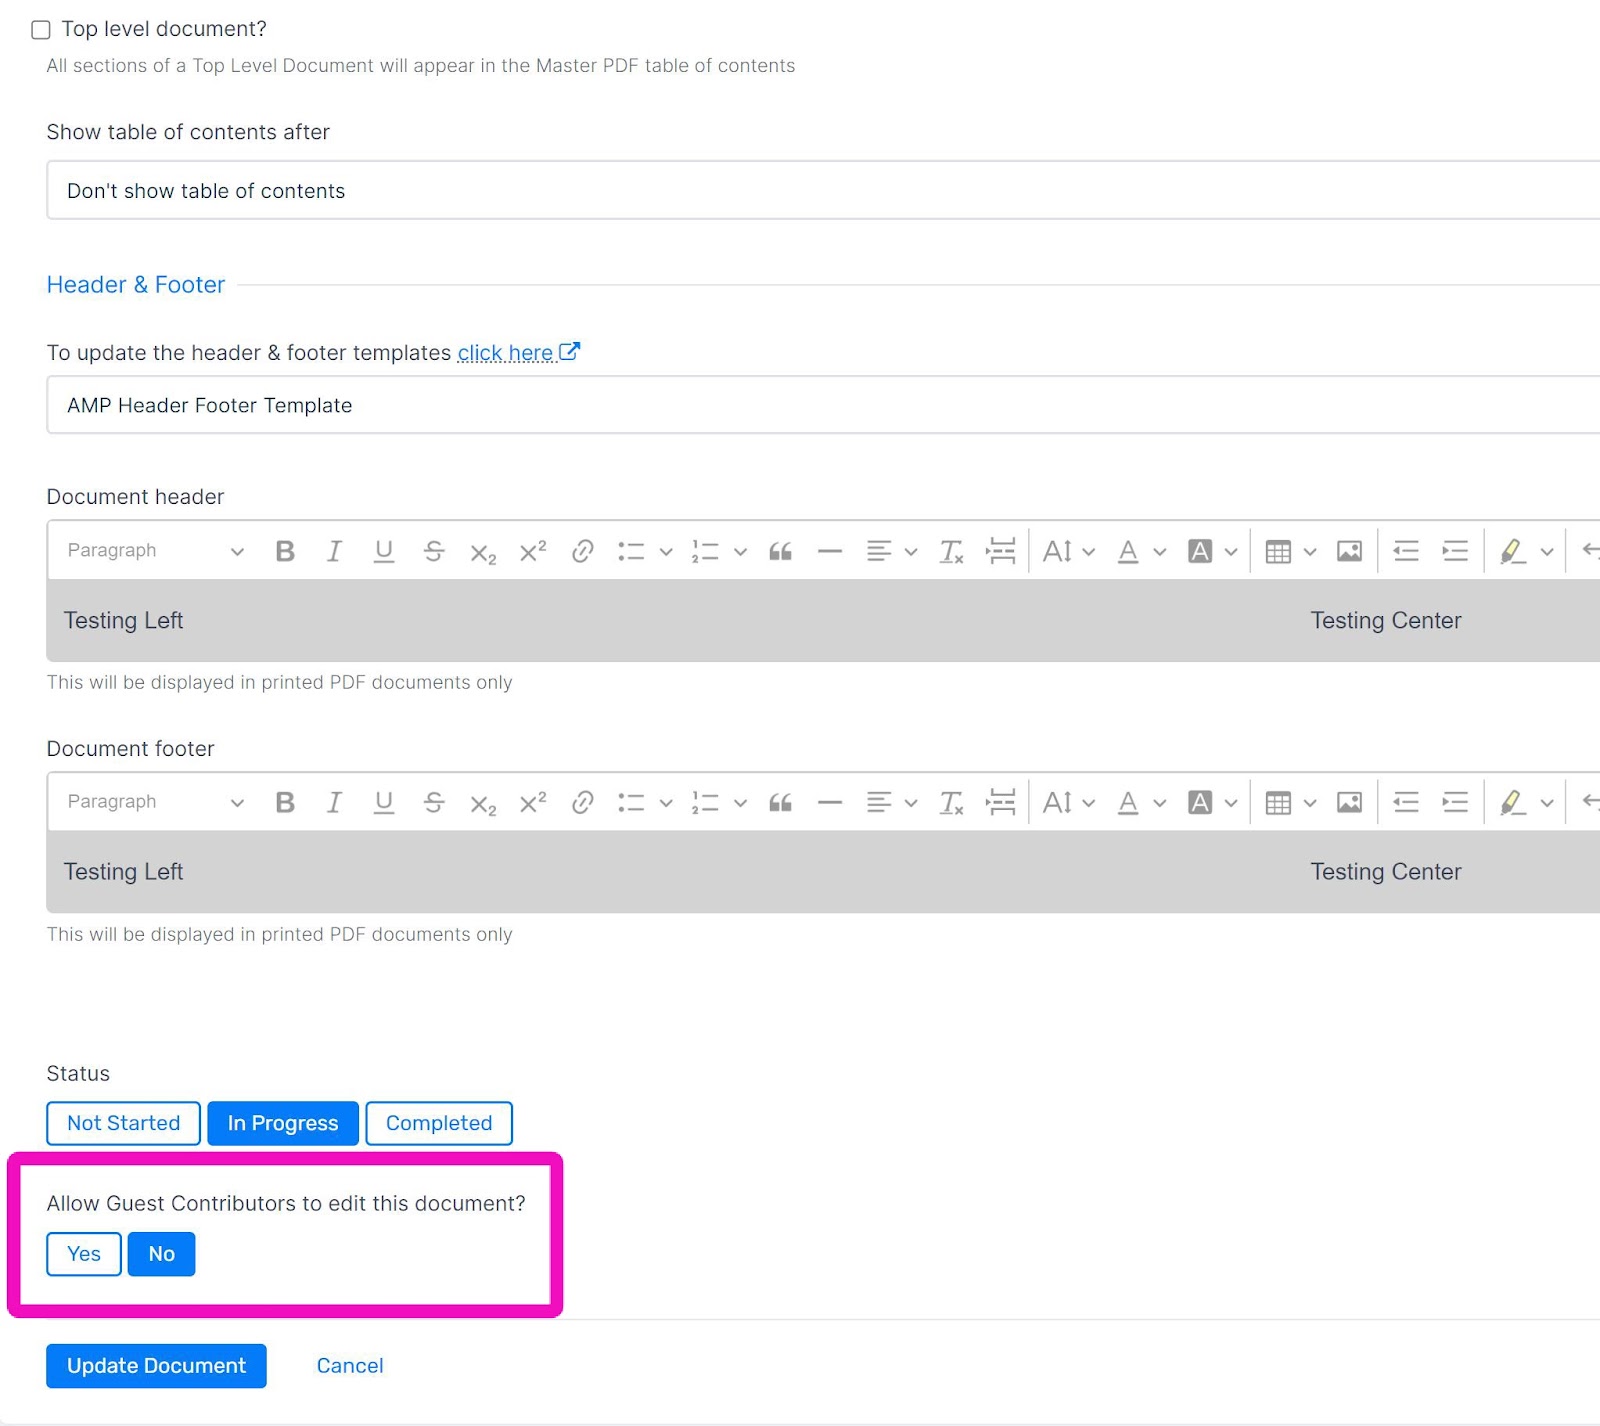
- Document Status: Not Started, In Progress, Completed
- Guest Contributor Permission: Yes, No
Editing Document Settings
Or you can navigate to document settings from an opened document.
Document Headers and Footers
- The Header/Footer area fits 3 lines of text by default. If more than 3 lines of text are added to a header/footer, space will be allocated from the document’s body to accommodate the header text.
- Users can choose 1, 2, or 3 columns for headers/footers. Writing in 12pt size font, 1 column fits 82 characters per line; 2 columns fit 41 characters per line; and 3 columns fit 20 characters per line.
- You can choose font sizes size 6pt to size 36pt font.
- Header/Footer does not print on table of contents pages.
- After documents are exported to PDF, the variables $page_number and $total_pages are replaced with page numbers.
- Open Project
- Go to the Header and Footer substage in the left hand menu
- Click Add New Header & Footer or Edit existing
- If New, name your Header & Footer
- Write and format
- Select how many columns you wish to use
- Input text or image contents into the available fields
- Click "Create Header & Footer " or "Save" if editing existing record
- Go to Documents in the left hand menu
- Find the 1st document you want to apply the header to, click Edit on its corresponding row to open Document Settings
- Select your Header & Footer Template and save
- Repeat for all documents in your list
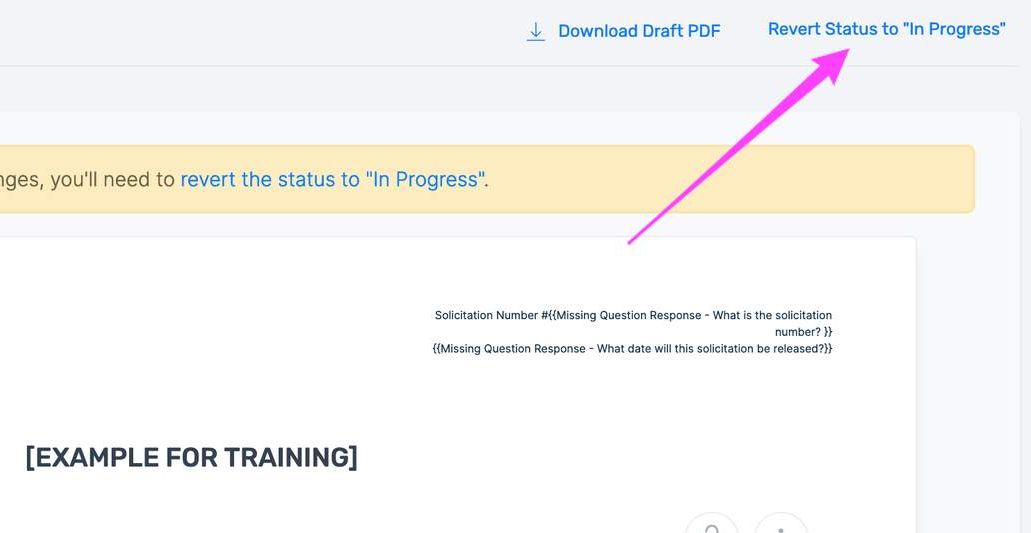
2.Complete a missing question response
Reordering Documents
You can reorder documents from the Documents tab.
Open your solicitation, and set the status to In Progress or Under Review
Open the Documents tab
Click a document's name, hold, drag to a new position, then release
The numbers in the document titles will update automatically after you reorder.
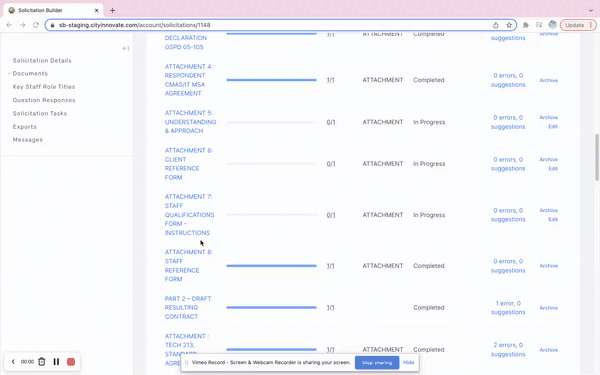
How to Export Document Drafts
All users can download PDF versions of individual Document Builder documents for review from the top of a document.
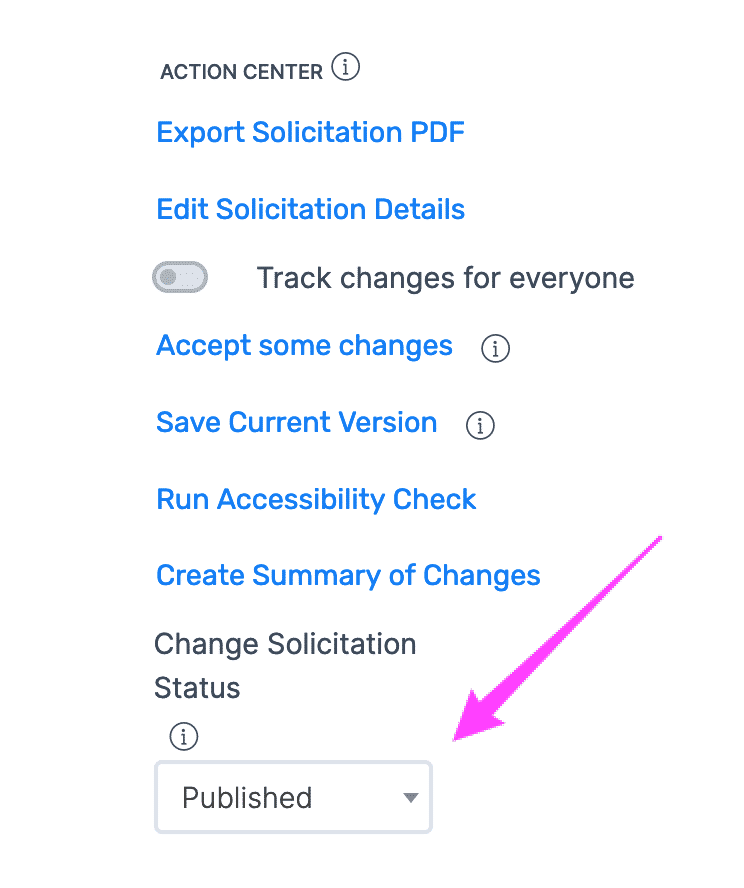
If you want to export drafts of all solicitation documents at once, go to the individual solicitation dashboard, navigate to the Action Center, and select Export Solicitation PDF.
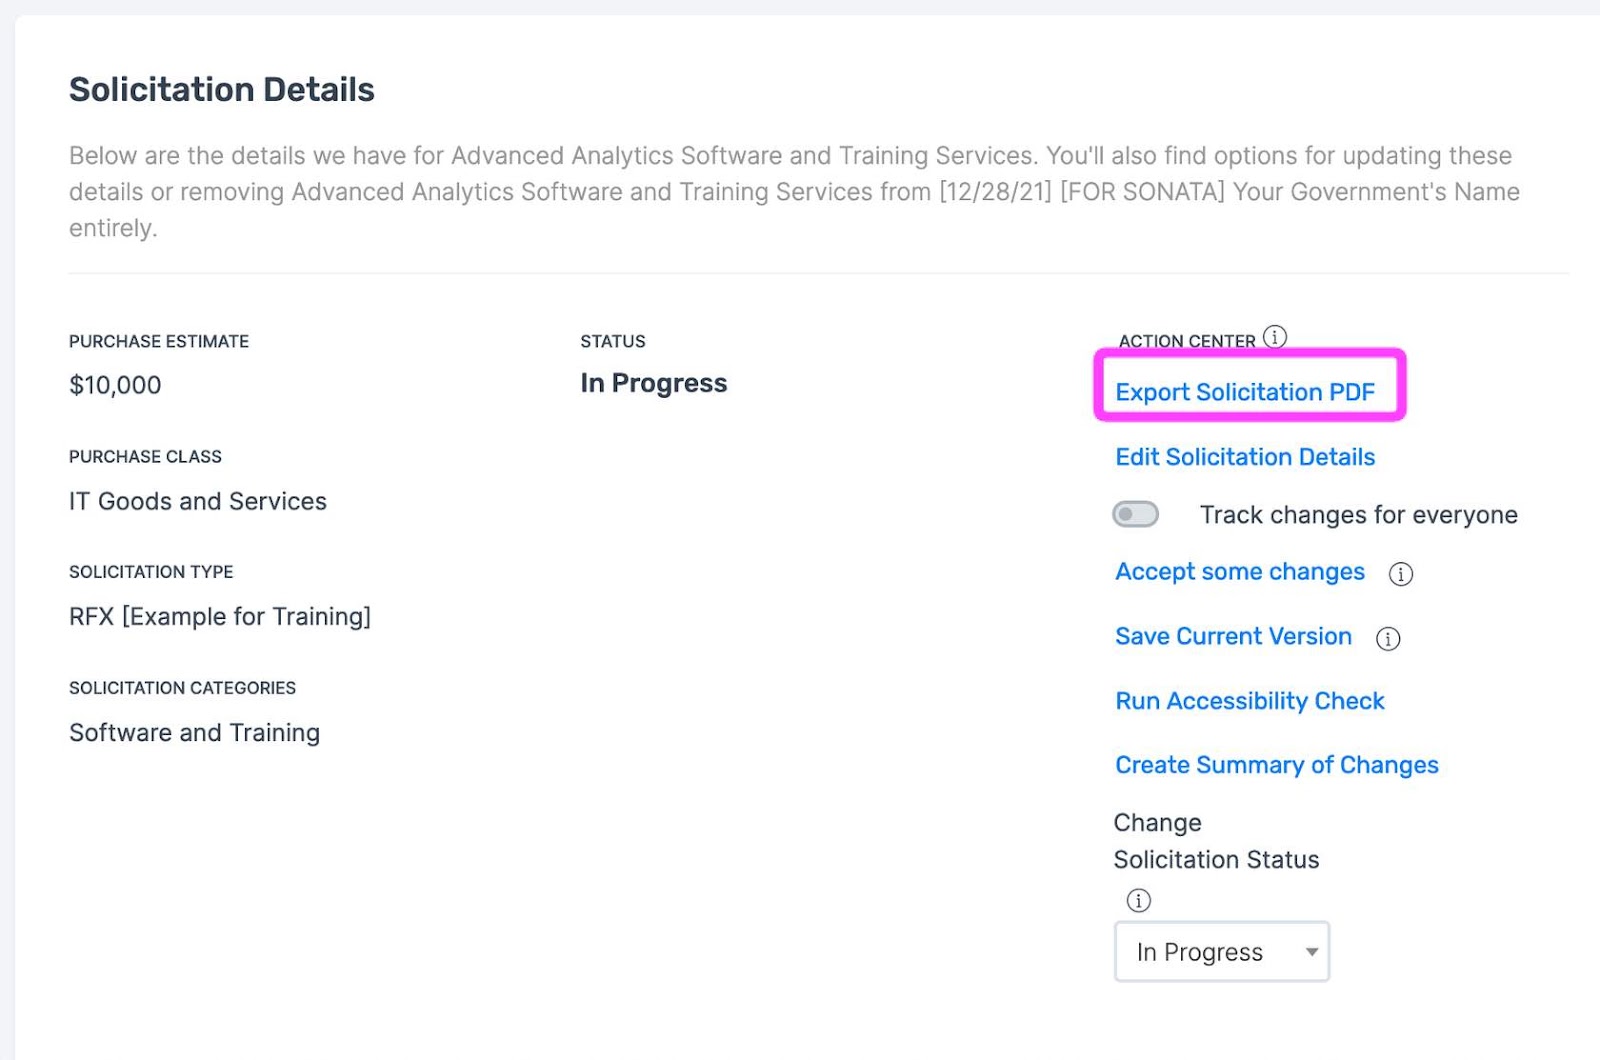
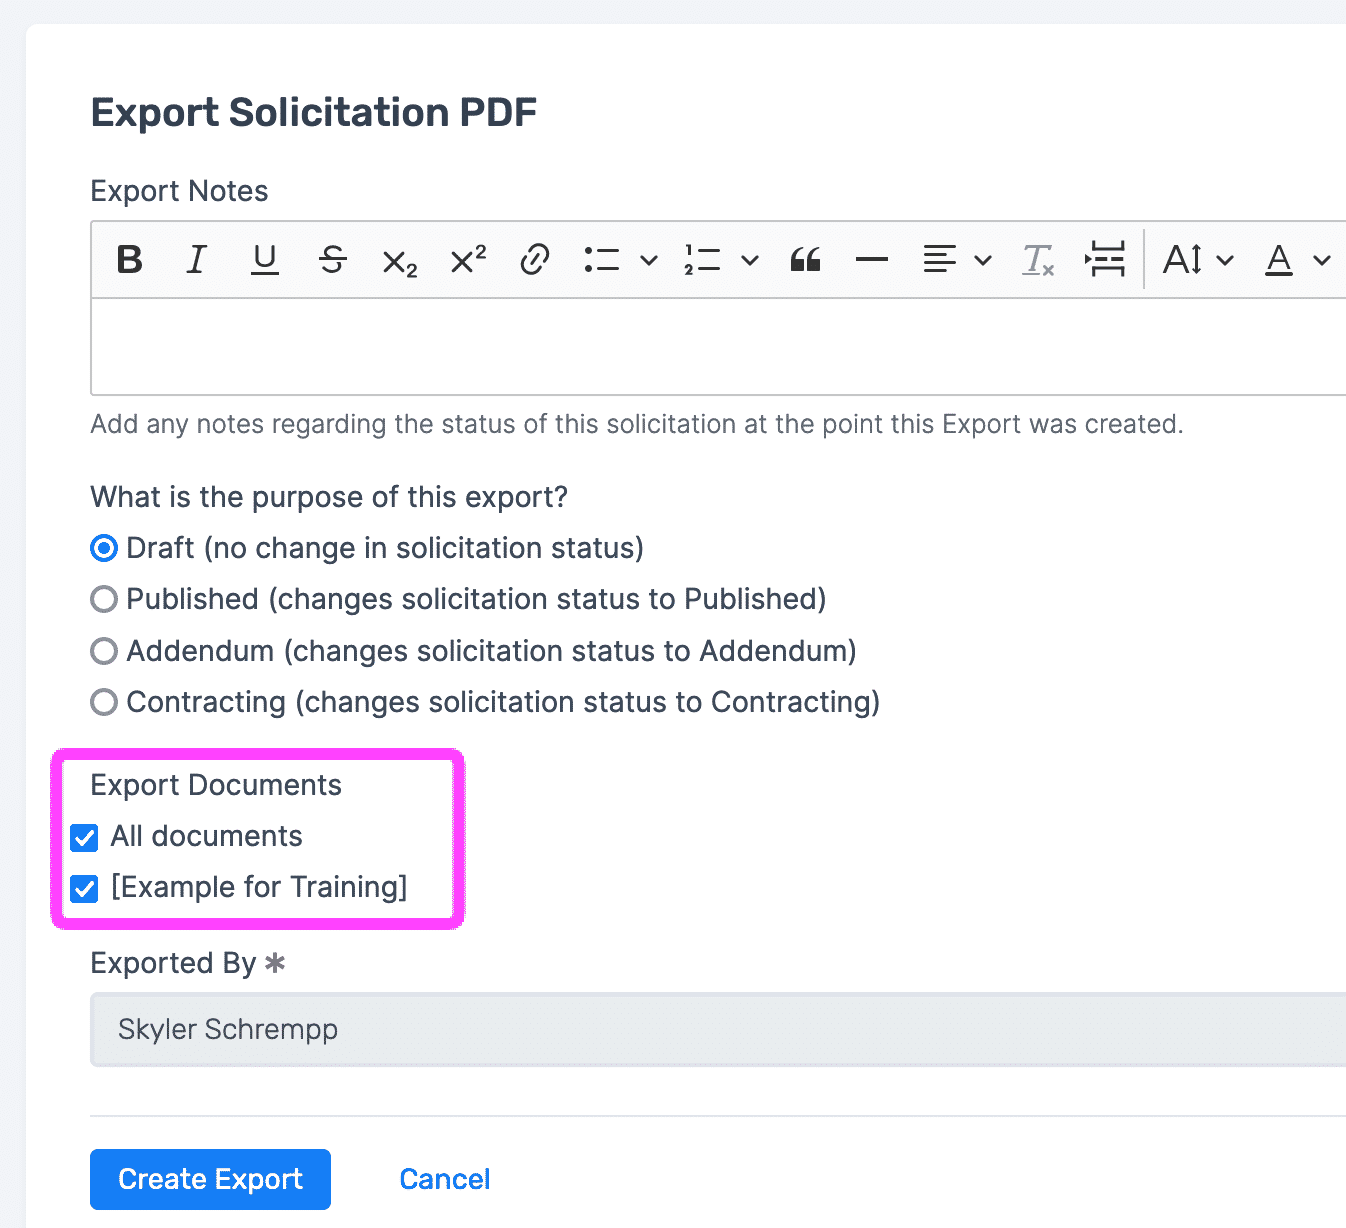
You can also select different purposes for your export or even add notes.
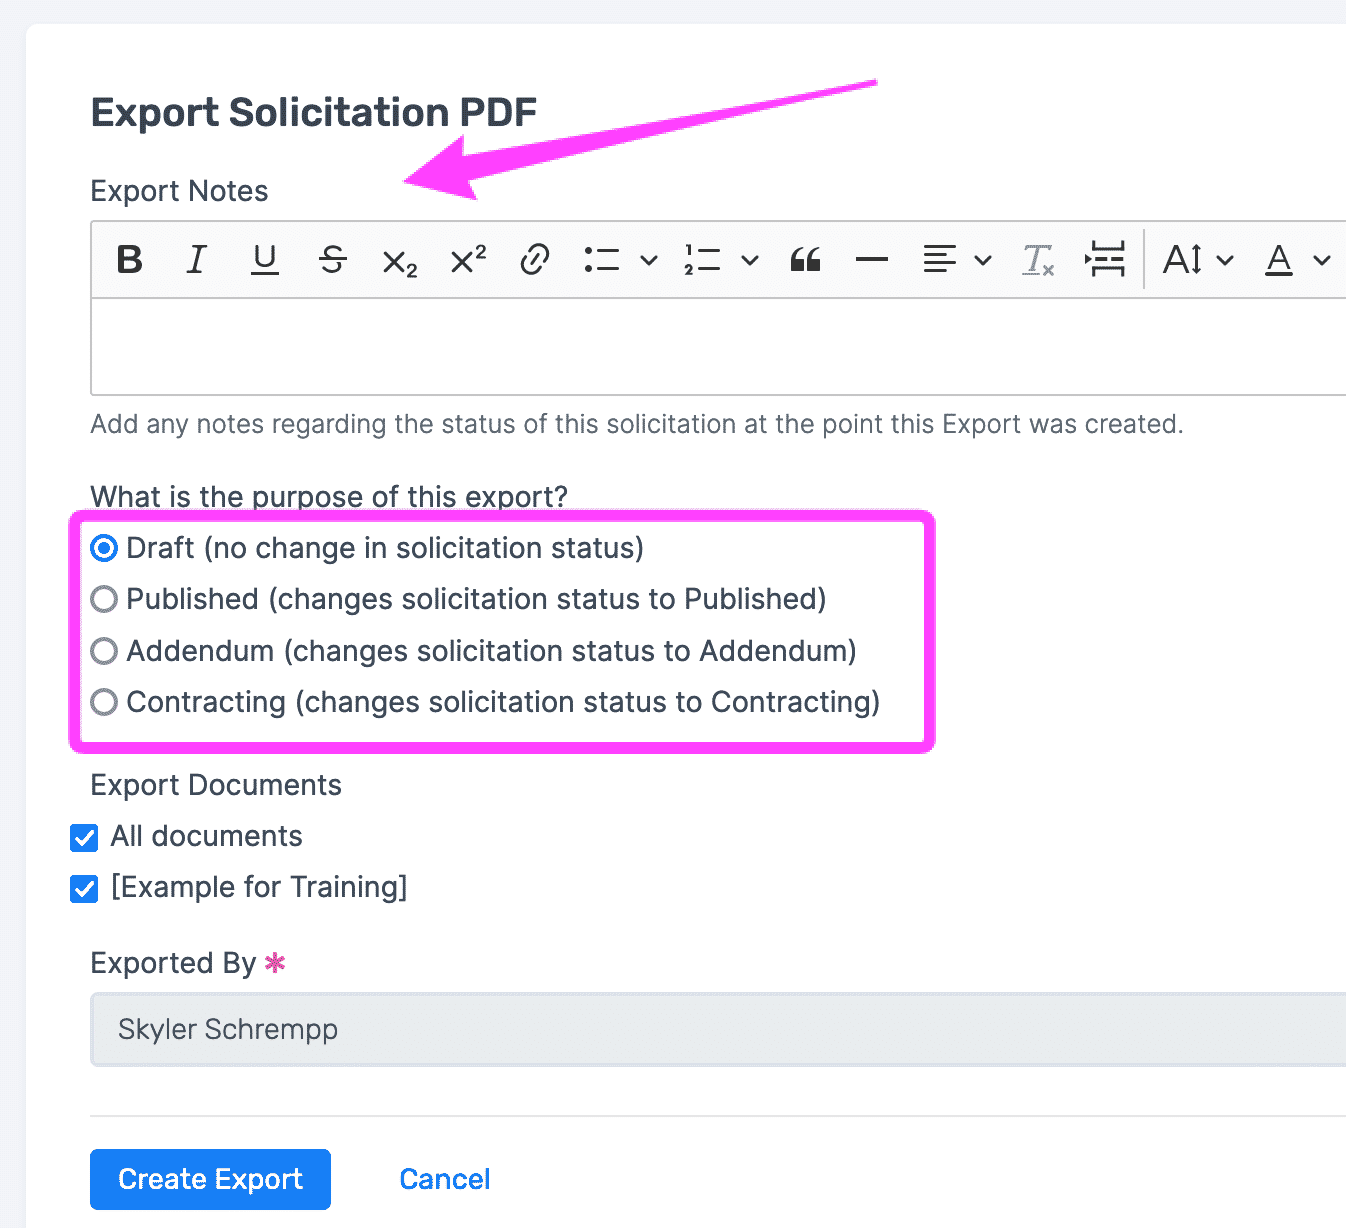
If you only want to export some of the documents in your solicitation, just make your selection and export.
Once the export is complete, you will be able to download a ZIP file from the Exports panel at the bottom of the Solicitation’s page.
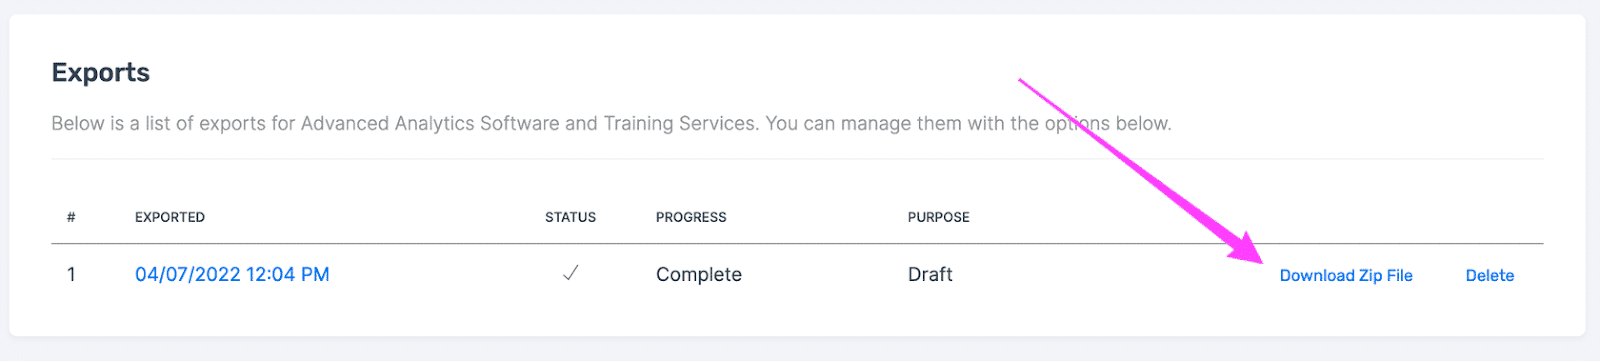
If you export for a purpose other than Draft, the status of your solicitation will automatically change to the purpose you exported for: Published, Addendum, or Contracting.
Document sections that can be edited by Guest Contributors will be labeled with "Guest Contributor."
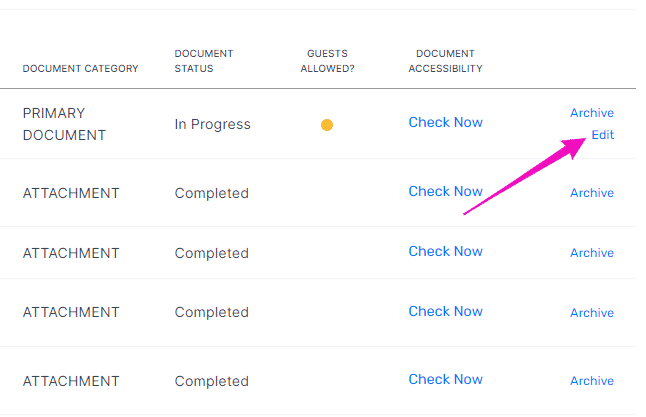
How to Grant Access to a Document and Document section
Owners and Editors can update permissions to documents and document sections. Navigate to the Document Panel and click ‘Edit’ for the document you want to grant access to.
In the Document Settings, under ‘Allow Guest Contributors to edit this document?’, select ‘Yes’ to grant access.
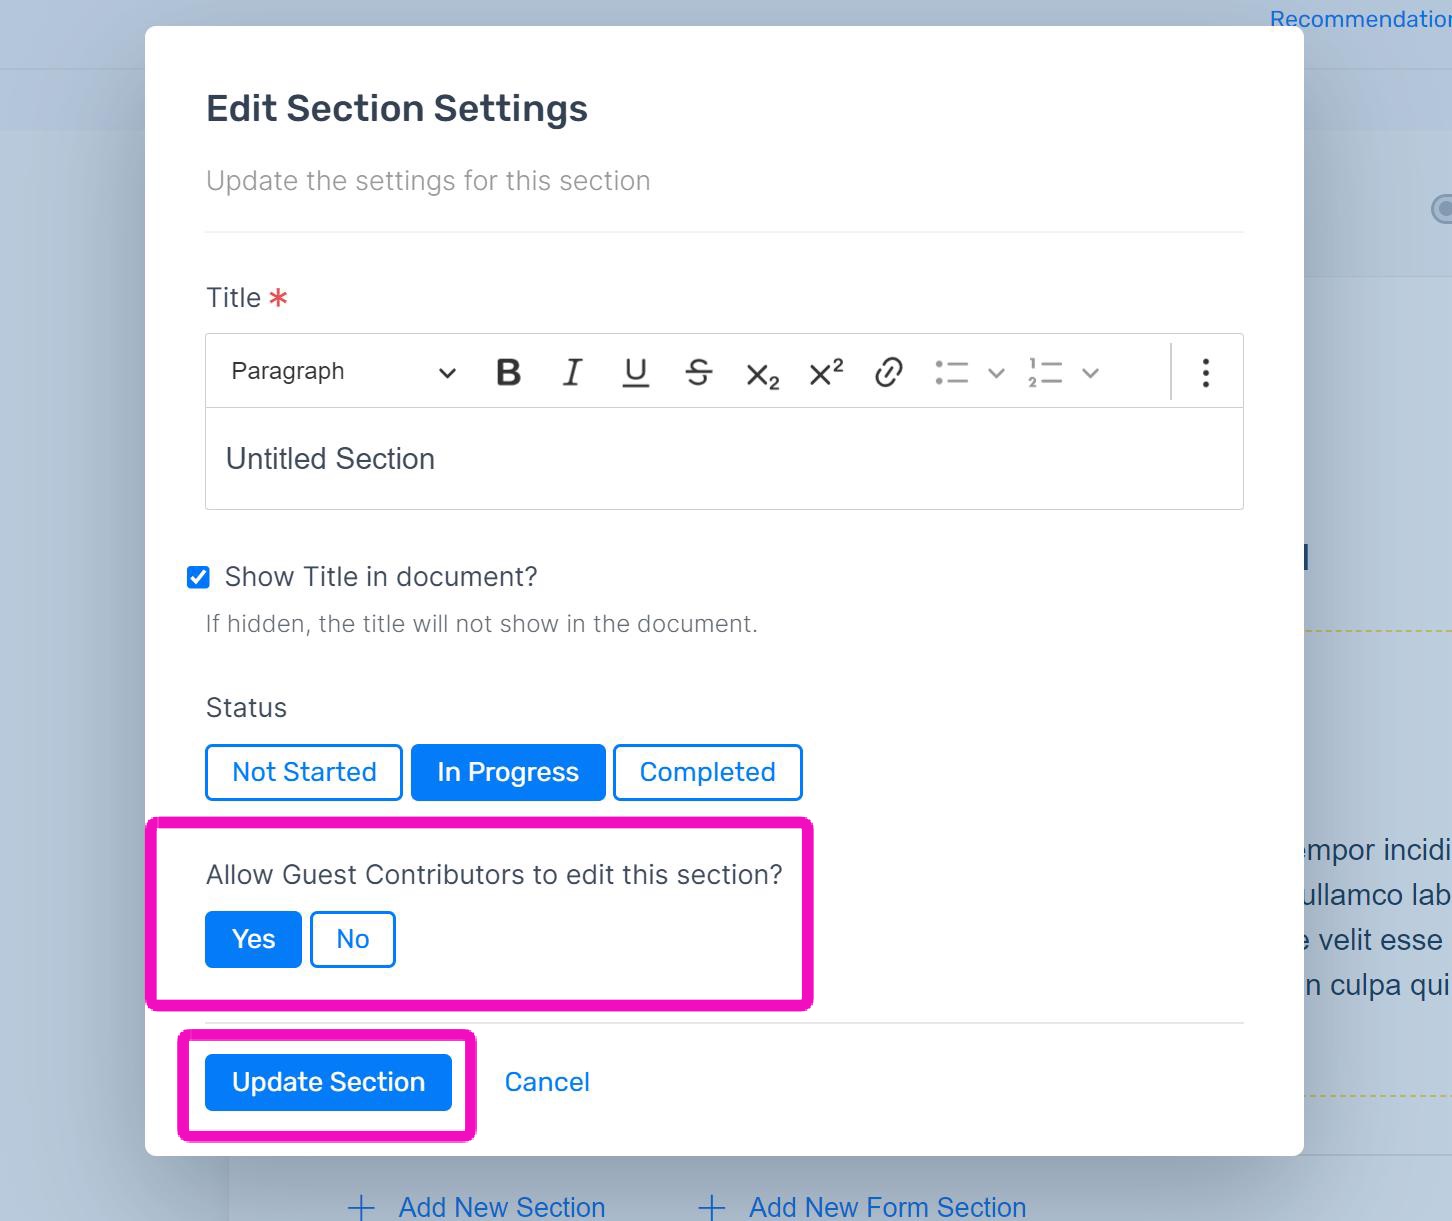
To grant access to a specific document section: click the 3 dots icon, and select ‘Section Settings’ in the pop-up menu.
In the Edit Section Settings window that appears, select ‘Yes’ under ‘Allow Guest Contributors to edit this section?' and update the section.
Related Articles
Reordering Documents and Sections
Reordering Documents You can reorder documents from the Documents tab. Open your solicitation, and set the status to In Progress or Under Review Open the Documents tab Click a document's name, hold, drag to a new position, then release The numbers in ...Sections
Sections on the City Innovate platform are subunits of Documents, and are used to organize information in a logical, and easy-to-read way. They are used to help readers find specific information quickly and easily, to group related information ...Importing and Exporting Documents and Projects
Importing/Converting Word (DOCX) and other Files You can convert uploaded Word files (DOCX) to Document Builder templates or docs for your project(s), as well as import other files as attachments. There are 2 features available depending on the type ...Release Notes
Our platform is updated on a regular basis to add new features and improvements based on learnings and feedback from our users. This support article describes what's new for each product release, with the newest release notes listed at the top. The ...Projects
A Project on the City Innovate platform offers a wide range of options for managing your document lifecycle, from a simple Document Builder stage to complex multi-stage builds. You will have the option of simply having a Document Builder stage, ...